
Since I started baking my own bread, I have been receiving numerous enquiries on how I do it and a lot many people wanting to bake bread on their own. It is indeed a happy feeling to know that so many out there are showing interest in baking bread themselves and wanting to stop buying store-bought bread. This interest is incentive enough for me to share a detailed post for anyone who wants to choose this healthy option and wanting to provide their family with whole-some, chemical-free food.
It was around the time when I had started eyeing all the food we bought from stores very suspiciously and every time I read the incomprehensible labels and their contents, I would swallow hard. There was a terrible disturbing feeling about any food item we consumed that wasn’t prepared at home. Bread was one such item on top of my list. The ingredients mentioned on label are enough to give you sleepless nights. If you don’t believe me, head over to your fridge and read the contents of the bread packet.

I tried making bread the traditional way many times but who was I kidding, the process was so long-drawn and time-consuming beside the fact that the end result wasn’t exactly appetising. There was always an element of doubt on whether the bread will rise or fall flat; whether it will turn out too dense and too hard etc etc.
Then, one day, my daughter showed me a newspaper clipping with an advertisement of a bread maker. Up until then I never knew there were appliances like bread-makers available in the market. Call me naïve but that’s just the truth.
But the brands mentioned were way too expensive. My critical mind somehow eyed these bread-makers a little suspiciously because for one, I haven’t heard about them from anyone I knew and two, how many useless kitchen gadgets do we have piled over the years to give us the jitters, right? So, I spent loads of time researching and comparing data before taking the plunge to invest in a bread-maker. And believe me that was one of the best decisions I had taken in the kitchen appliances area.
It was around January last year when I finally gave in to the temptation of buying a bread-maker and it has been one satisfying year to say the least. No pangs and guilt-free indulgence. This is such a joy and to know I had to struggle and research so much to find a wonderful solution sitting right there all the time made me want to share this post with all of you.
So, you can make your own bread and eat it too!
I am going to give you all the inputs and everything you will need to know about it, right here for you. I just want to make it easy for anyone who has been looking for this just like I was a year ago!
Now, bread maker is not a common appliance in the Indian market and it’s quite unheard of in an Indian household. And bread-maker is still an alien concept for us. After a thorough research on efficiency, cost, durability and product reviews, I finally zeroed in on the Glen Bread Maker. The price range was comparatively better than many others. So, I took the bold step forward and ordered it online through Amazon while keeping my fingers crossed.

Once it arrived, I still had my own doubts and with a lot of apprehension, set out to try my first bread. I read the manual thoroughly and got my ingredients together. And what do you know! My first trial was a grand success! Super soft , yummy bread.
RECIPE

This is my tried and tested recipe for fool-proof bread making. It has never failed me. And it’s all yours now. I make my variations of whole wheat or half-maida and half- atta. You can do your own variations too, just add 1/3 cup extra water for every cup of whole wheat flour.
If you don’t have a bread maker, no worries. Follow these steps instead.
- Place the yeast and sugar in a large bowl and stir in the warm water and wait until everything is dissolved. Add in warm milk, butter/oil and the salt, then stir in the flour. Once it all comes together, transfer the dough on to a clean surface and knead well. The dough we are looking to create must be soft and pliable that is not too sticky.
- Knead on a lightly floured surface or in the bowl itself, for 6 to 8 minutes, or until the dough is smooth and elastic.
- Place the dough back in the bowl and cover with a kitchen towel. Allow it to rise for about an hour, or until doubled in size.
- Once that’s done, beat the dough down and place it in a lightly greased loaf pan and cover it to let it rise in it.
- Meanwhile, preheat the oven to 375 degree F (180 degree celsius).
- Pop the loaf pan in the oven for 25-30 minutes or until golden brown.
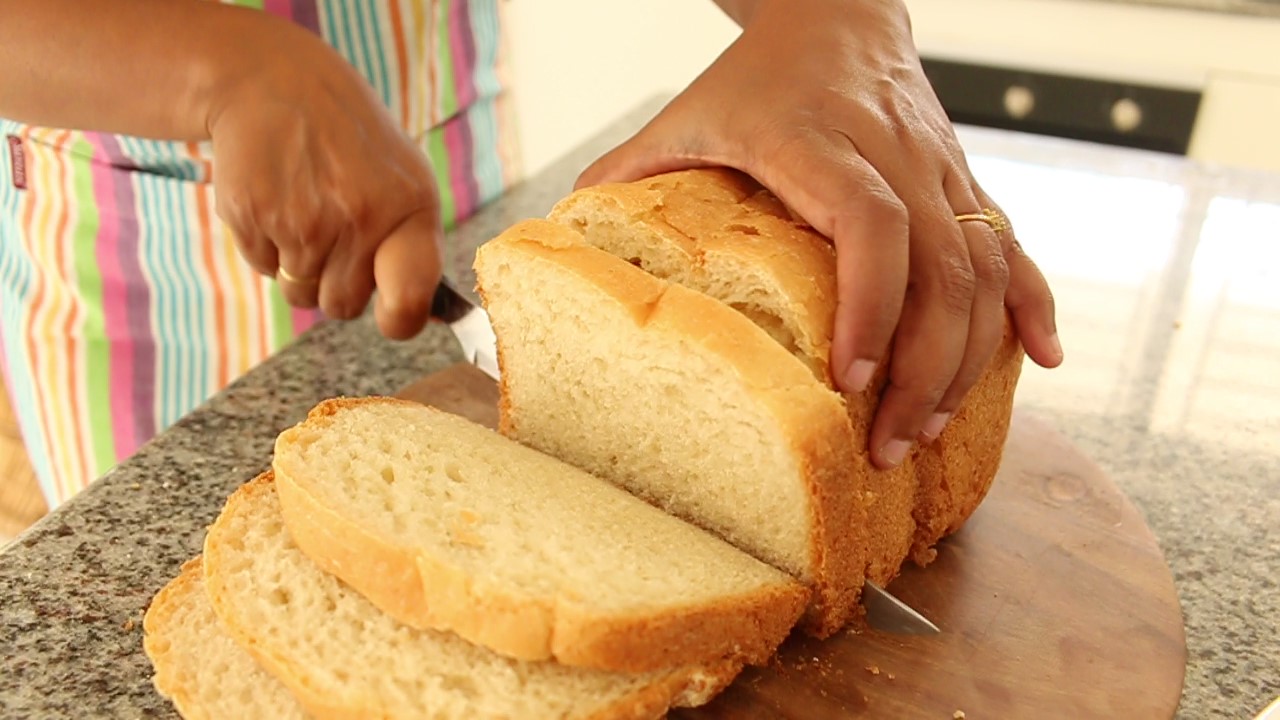
- Allow it to cool on a wire rack before serving.
While using a bread maker, all you do it put the ingredients in the bread maker according to the instructions given in the manual and wait for it to do magic!
It takes almost 3 hrs for the bread to get ready from the start time; i.e, from kneading the dough to rising it and then baking it to golden perfection. All you need to do is just measure the ingredients, drop it into the bread maker, adjust the setting and go about your work. Glen Bread Maker takes care of everything for you, one step after another, on its own. A lovely aroma will tell you that your bread is ready.
Baking bread at home is a wonderful way of making a nutritious staple without the long list of artificial additives, preservatives and unthinkable chemical concoctions that industrial mass-produced “loaf” that we buy at the supermarket. Let’s not be naïve enough to believe their claims of being “No Preservatives, Whole-wheat, multi-grain, fortified etc ” . Of course you know that anything we buy off the shelf has to have a shelf life and that can be achieved only with preservatives.
I totally understand the concerns of anyone who hasn’t tried baking bread at home. The idea of baking your own loaf might sound like a daunting task, and that’s exactly what prompted me to buy a bread maker because for me it took the guessing work out of the complex process of bread making.
Let me tell you a few things that will put you at ease:
- Even a child can do it:
Yes, you heard me right. With the most basic ingredients, all you need to do is drop them in the bread-maker in the right order and switch-on the machine. That’s all. How simple is that. Show your kids once and they will take care of it. Hope this makes you feel a little better already.
- No fancy ingredients:
When I started going through recipes for homemade bread, there were ingredients like bread flour (what’s that? Seriously), corn meal, shortening and other things which needed me to hunt down these ingredients from speciality stores. It would definitely put anyone off. I for one, am not someone who likes to complicate things. So, don’t worry guys, I have you covered. I have done enough research on your behalf and cracked down the best recipe. And lucky for you, because I am including my tried and tested recipe here for all of you; the ingredients you will need is the basic flour (Maida/Atta), milk, water, salt, sugar, oil and yeast. Simple enough right? Okay, so far so good.
- Time saver:
Time is a major factor for all of us, whether we are individuals, couples, parents (stay-at-home or working) all of us are in a constant race against time. Therefore, this baking our own bread might seem too tedious, isn’t it? Not at all. It will not take any extra time out of your day at all. How, you ask? Well, whether it is early morning or evening, whichever time works for you, all you need to do is measure and put your ingredients into the bread maker, switch it on and forget about it for the next 3 to 4 hours. It doesn’t require any intervention from your end whatsoever. Just go about your work without any botheration. Once the bread is done, you will hear a beep. (But of course, you will get to know it’s ready by the lovely aroma wafting in the air long before the beep sound)
Though I would say that once you learn how to make bread from scratch using this recipe I shared, you won’t need anything more than an oven. And No, you Don’t need a bread maker! I am just sharing this information regarding bread maker because it helped me immensely and for a bread loving family like mine a Bread Maker worked like magic. I just had to measure the ingredients and drop it in and the bread would be ready in a few hours; that’s it! No Kneading, No setting it out to rise or put it in a loaf pan to bake. Just one step and everything else was taken care. And I have to say, I got back enough and more worth the money I spent in the form of bread out of my bread maker 🙂
Here’s how to order one online, if you are looking for one.
GLEN Bread Maker @ Amazon#
If you haven’t smelled freshly baked bread, you haven’t lived my friend.
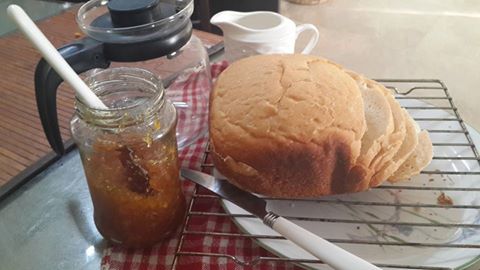
With the bread maker you don’t just bake breads; you can pick the kneading setting to knead the dough for absolutely anything. You can let the dough rise in the bread maker and then take it out to make chappati, burger buns, pizzas, bread sticks, French loaves or anything else with it if you have an OTG. What’s more, you can make jams in the bread maker too. What could be better than that right! Homemade jams to go hand-in-hand with your homemade bread…Isn’t that just perfect!
We have been loving the freshness of homemade bread for years now. Not to mention, absolutely no worries about preservatives or anything artificial. I wonder why I waited so long to start making bread…
PS: All pictures of food used in this post are my own. They are original and not taken from any other source to maintain authenticity.
#Read my disclosure policy here
Bake wholesome bread at home using simple ingredients. Grow your own herbs to enhance flavor with our Free Home Gardening 101 for Beginners. Ensure your baking area is toxin-free by following our DIY Natural Cleaners e-Course. Manage kitchen scraps sustainably with our Free Home Composting 101 resource.