This year started out for us with taking on some of the bigger (read nerve-wracking) projects that we had put-off for a few years due to lack of clarity on how to go about it and of course budget constraints.
This is post 5 of the series I am writing wherein I share my personal experiences and thoughts from the past year. Before we move on, please read the previous posts if you haven’t already done. You can read my first, second, third and fourth post here.
From the time we decided to start our organic farm, we did everything to learn up on the subject. We signed up for workshops, read up a lot on the internet and took notes of any information that helped equip us for the upcoming project.
Soil preparation is the first step towards having a healthy and successful garden. The best garden soil is fertile, well-drained yet retains some moisture and has a good amount of organic matter. This helps the soil attracts earthworms and good microbes. This in turn helps decompose organic matter and keep the soil fertile and healthy continuously. A soil devoid of earthworms and microbes is dead soil; and we don’t want that! Therefore, my first attempt was to prepare the soil and make sure it is healthy to support a wide variety of microorganisms and earthworms.
Let me break that down for you into 3 steps for easy understanding. Please note that, I am sharing what I did to get my land ready for cultivation and the results are there for everyone to see at my facebook page https://www.facebook.com/kalpavrikshafarms/
This is not just based on any one particular method but instead a sum total of all my various sources of learning and understanding. I had come up with a plan that I presume would work for me and hope it works for you too.
3 steps to prepare the soil for planting:
1. Loosen the soil and remove the weeds
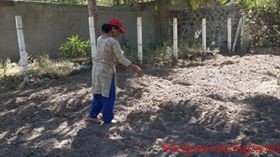
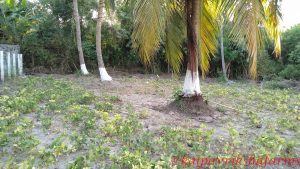
First, we plough the soil to loosen it up and in the process remove all the weeds growing in that area. Gentle tilling worked for my slightly clayey soil. There is a lot of information advising one to do soil testing to understand the soil pH and other requirements but I skipped that step. Once the soil was tilled and ready I got ready with the second step.
2. Plantlegumes to enable natural Nitrogen Fixation
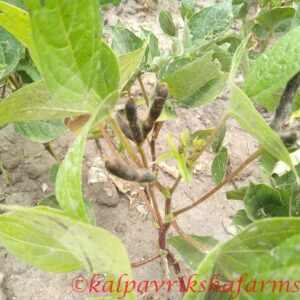
I decided to do this as my next step as this is something I had been teaching in my biology class for quite sometime. This is the most natural way to make the soil rich in nitrogen content and regain its lost fertility. My plan is to sow urad dal (black gram) in the area identified for vegetable gardening patch for this purpose. Legumes like black gram are great biological nitrogen fixers.
Why is this important?
If you remember reading in your science textbooks during school years about the symbiotic relationship between the Rhizobium bacteria and the root nodules of leguminous crops, you might be able to connect the dots. These nitrogen fixing bacteria fix nitrogen for the crops and in turn get food from them. (Okay, sorry for boring you with that biology lesson, but it had to be done – ahem… former biology teacher turned farmer here, you see)
pic courtesy: google images
Once the crops are ready, we can harvest the pods and the rest of the plant can be ploughed back into the soil. Now the soil’s nitrogen requirement is replenished naturally without the use of chemical fertilizers like urea.
3. Applying manure and preparing raised beds:
Applying manure to the soil is the next important and final step towards preparing soil. For long-term soil health it is advisable to go in for raised beds. By doing this, you are taking care of the soil keeping in mind its long-term health and not just a quick fix solution. I chose to prepare raised beds for a simple reason; I believe that if I take care of the soil, the soil will in turn take care of my plants. All we need to do is ensure that the soil had all the 3 important elements:
Physical – Air and water
Biological – Microbes / Earthworms
Chemical – Minerals in the form of Manure
We provide the physical needs by ploughing and irrigating the soil. Next step is to provide the soil with ingredients that will help the microorganisms and earthworms thrive by providing organic matter. And to fulfil the mineral requirement, we need to provide manure. If there is enough air, water and organic matter the soil remains healthy and supports plant growth. All we need to do is pay attention to the soil’s health.
I plan on layering my raised beds alternatively with dried sugar cane husk, cow dung manure and my own garden soil. I will discuss preparation of raised beds elaborately with pictures of my own in my subsequent posts.
8 Mar 2018
With all this information at hand, we chart out a plan for this week’s farm visit. We calculate and decide on sowing urad dal this week; This way we will have enough time left on hand before sowing season. If we sow seeds now, in approximately 3 months time, the crop will be ready for harvest, just in time to start our preparation of raised bed.
This reminds me to call the care-taker to make sure he gets the patch tilled and ready for sowing urad dal. A mental note to procure black gram seeds from my organic vendor and pack it along with our things to carry to the farm.
The most awaited Saturday arrives and we reach our farm bright and early. We find the patch freshly tilled and ready to sow the seeds. So, we spend a happy day sowing seeds and supervising the farmhouse construction.
****
The next step is to prepare the raised beds for the vegetables. Click here to read how to do that.


Comments